Beskrivelse
Malfunctions and Reasons
1. Q: The speed of ride is 0 all the time
A: Incorrect location the installation of Magnet and Sensor
2. Q: The numbers display are incorrect
A: Incorrect parameter ( such as the Perimeter of the bicycle wheel)
3. Q: Slow reaction
A: Bicycle computer works under the temperature 0 degree
4. Q: Blank screen
A: Don't let computer to be insolated under the sunshine, please keep it into the shade corner
5. Q: Dark display
A: Battery is not connected well or the battery is down, please try to connect it well or replace it.
6. Q: No drawing on screen
A: Take out the battery and 10 seconds later to put it back
If still have problem, please feel free to tell us, we will try our best to help you solve your problem.
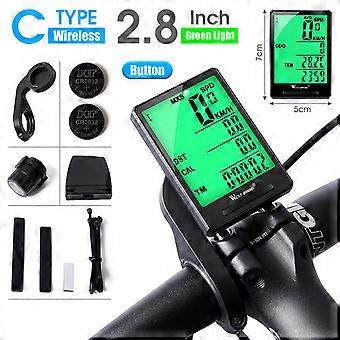
Product Information
Backlight Color: Green
Waterproof: Yes
Size: About 75*50*13mm
Power supply: 2032 Button Cell
Weight: About 126g (Wired), about 135g (Wireless)
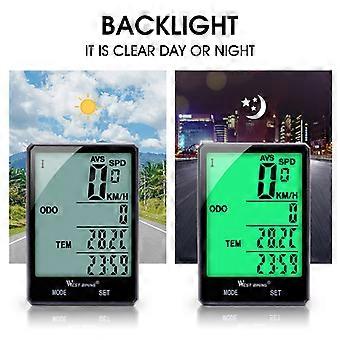
Backlight: Long Backlight: press two keys at the same time to turn on / off backlight
Application: MTB, Road Bike, Fixed Gear
Package Content: 1Bicycle Computer, 1 Sensor, 1 Magnet, 1 Extension Mount, 1 Stickers6 Ties, 1 Packing Box1 Manual
Features:
- Large screen of 2.8-inch can measure temperature and speed
- Bicycle odometer with LED backlight
- Portable, durable and convenient
- Easy to read LCD display with large screen
- Easy to control with mode touch, ideal companion for your bicycle
- Easy to install firmly with mounting accessories
- Perfect to use when hiking, climbing, riding and other outdoor actives
- Ideal assistant for bicycle training
- Time display function, also can be used as a wonderful gadget for traveling.
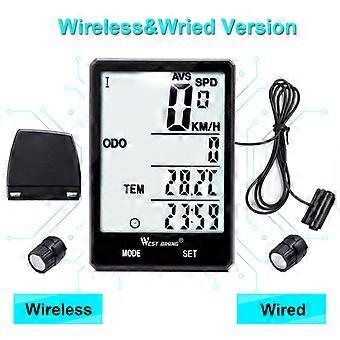
Type A - Wireless Version: Bike Computer, Sensor, Magnet Head, Ties & Stickers, Extension Bracket, Batteries *2, Binding, Box, Manual
Type A - Wired Version: Bike Computer, Magnet Head, Ties & Stickers,Battery, Extension Bracket, Binding, Box, Manual
Type B - Wireless Version: Bike Computer, Sensor, Magnet Head, Ties & Stickers, Invisible Bracket, Batteries *2, Binding, Box, Manual
Type B - Wired Version: Bike Computer,Magnet Head, Ties & Stickers,Battery,Invisible Bracket, Binding, Box, Manual
Invisible Bracket
1. Use ties to fasten the base;
2. Buckle the computer on the base;
3. Magnet head installation
Note:The sensing points circled need to be aligned installation
Instruction
(Mode-Left key, Set-Right key)
(Please tear the screen protective film first, and read step by step)
ComputerInstallation
Push the computer along the chute, the button stand fix the computer and hold. Removingit just need to pull it out in reverse direction along the chute.Check the installation:Turn the frontwheel to run, and look to the screen to confirm if it's got signal. If there has no signal or the reaction is not sensitive please adjust the relative location of Sensor and Magnet slightly.
20 Functions
-Memory functions
-Speed tendency (3 km per grip)
-Two bicycle using
-SPD Current speed(0-99.9)
-ODO Odometer
-DST Trip distance
-MXS Max speed
-AVS Average speed
-TM Trip riding time
-CLOCK 12H/24H
-SW Stop watch
-CAL Calories Level
-FAT Fat burn measurement
-TEM Temperature
-Backlight
-Low power indicator
-Maintenance alert
-KM,Mselectable
-Setting tyre circumferenceand ODO
-Autooff
Battery Installation
Remove the battery cover and put a piece of CR2032 battery into the case. Notice:Positive pole(+) should be set upwards. Then cover the the battery cover and screw down.
Pedestal Installation
In the accessories pack there has a strap which can be used to fasten the Seat onto the handlebar, as well we can use the back-up plate to fasten it.
Sensor and MagnetInstallation
Install the sensor onto the front fork of bicycle, and the magnet is installed onto the steel wire at the same side of wheel. Sensor can be underlaid with back-up plate and use the strap to fasten onto the front fork.
It needs to be installed in 60cm distance from the computer, as the picture shows. Adjust the comparative location of Sensor and Magnet. The plane must face to the inductor. Keep the space to be 1.5mm.
Magnet cannot be set to the center of Sensor face-to-face, it's better with the head or tail of Sensor
Wheel Perimeter Setting
Input the circumference from 0 mm to 999 mm. You can also measure it by yourself by the following ways: First make amark on the ground when the nozzle is on the below.
Thenmake the wheels run once the gas mozzle on the below againplease mark. And measure the distance between the two marksyou can get your wheel perimeter.
If the distance is 1615 thenyou should input 1615. (You can also measure the diameterand multiply 3.14 to get the perimeter.)
Setting Steps
1 Put the battery on - Setting KM, M
-
Fruugo-ID:
235383376-503581170
-
EAN:
9044376448746
Produktsikkerhetsinformasjon
Vennligst se produktsikkerhetsinformasjonen som er spesifikk for dette produktet skissert nedenfor
Følgende informasjon er gitt av den uavhengige tredjepartsforhandleren som selger dette produktet.
Produktsikkerhetsetiketter

Sikkerhetsadvarsler:
IMPORTANT SAFETY INSTRUCTIONS
READ BEFORE USE: Read all instructions and safety warnings before using this product. Failure to follow these guidelines could result in injury, damage, or malfunction.
GENERAL WARNINGS
INTENDED USE: Use this product only for its intended use as described in the user manual.
SUPERVISION REQUIRED: This product is not intended for unsupervised use by children or persons with reduced physical, sensory or mental capabilities.
INSPECT BEFORE USE: Inspect before use for any signs of damage or wear. Do not use if damaged.